반응형
안녕하세요.
zxing 라이브러리를 사용하여 간단한 바코드 스캔 및 출력을 해보겠습니다.
- Android SDK 24이상을 지원하려면 zxing:core 3.4.0을 이용
- Android SDK 14이상을 지원하려면 zxing:core 3.3.0으로 다운그레이드
참고: https://github.com/journeyapps/zxing-android-embedded
journeyapps/zxing-android-embedded
Barcode scanner library for Android, based on the ZXing decoder - journeyapps/zxing-android-embedded
github.com
1. build.gradle (Module:app)

2. Manifest.xml

3. MainActivity
1 2 3 4 5 6 7 8 9 10 11 12 13 14 15 16 17 18 19 20 21 22 23 24 25 26 27 28 29 30 31 32 33 34 35 36 37 38 39 40 41 42 43 44 45 46 47 48 49 50 51 52 53 54 55 56 57 58 59 | public class MainActivity extends AppCompatActivity { Button btnScan, btnPrint; TextView tvTest; ImageView ivTest; static String string; @Override protected void onCreate(Bundle savedInstanceState) { super.onCreate(savedInstanceState); setContentView(R.layout.activity_main); tvTest = (TextView)findViewById(R.id.textview_test); ivTest = (ImageView)findViewById(R.id.imageview_test); btnScan = (Button)findViewById(R.id.button_scan); btnScan.setOnClickListener(new View.OnClickListener() { @Override public void onClick(View v) { new IntentIntegrator(MainActivity.this).initiateScan(); } }); btnPrint = (Button)findViewById(R.id.button_print); btnPrint.setOnClickListener(new View.OnClickListener() { @Override public void onClick(View v) { tvTest.setText(string); BarcodeEncoder barcodeEncoder = new BarcodeEncoder(); Bitmap bitmap = null; try { // 지정한 번호,포맷,사이즈로 바코드 만들기 bitmap = barcodeEncoder.encodeBitmap(string, BarcodeFormat.UPC_A,200,20); } catch (WriterException e) { e.printStackTrace(); } ivTest.setImageBitmap(bitmap); } }); } @Override protected void onActivityResult(int requestCode, int resultCode, Intent data) { if(resultCode == RESULT_OK){ if(requestCode == IntentIntegrator.REQUEST_CODE){ IntentResult result = IntentIntegrator.parseActivityResult(requestCode, resultCode, data); if (result != null) { if (result.getContents() != null) { Toast.makeText(this, "Scanned: " + result.getContents() + "\nFormat:" + result.getFormatName(), Toast.LENGTH_LONG).show(); string = result.getContents(); } } } } else { super.onActivityResult(requestCode, resultCode, data); } } } http://colorscripter.com/info#e" target="_blank" style="color:#e5e5e5text-decoration:none">Colored by Color Scripter | http://colorscripter.com/info#e" target="_blank" style="text-decoration:none;color:white">cs |
4. activity_main.xml
1 2 3 4 5 6 7 8 9 10 11 12 13 14 15 16 17 18 19 20 21 22 23 24 25 26 27 28 | <?xml version="1.0" encoding="utf-8"?> android:layout_width="match_parent" android:layout_height="match_parent" android:orientation="vertical"> <Button android:id="@+id/button_scan" android:text="SCAN" android:layout_width="wrap_content" android:layout_height="wrap_content"/> <Button android:id="@+id/button_print" android:text="PRINT" android:layout_width="wrap_content" android:layout_height="wrap_content"/> <TextView android:id="@+id/textview_test" android:layout_width="wrap_content" android:layout_height="wrap_content"/> <ImageView android:id="@+id/imageview_test" android:layout_width="match_parent" android:layout_height="wrap_content" /> </LinearLayout> http://colorscripter.com/info#e" target="_blank" style="color:#e5e5e5text-decoration:none">Colored by Color Scripter | http://colorscripter.com/info#e" target="_blank" style="text-decoration:none;color:white">cs |
여기까지 작성하시면,
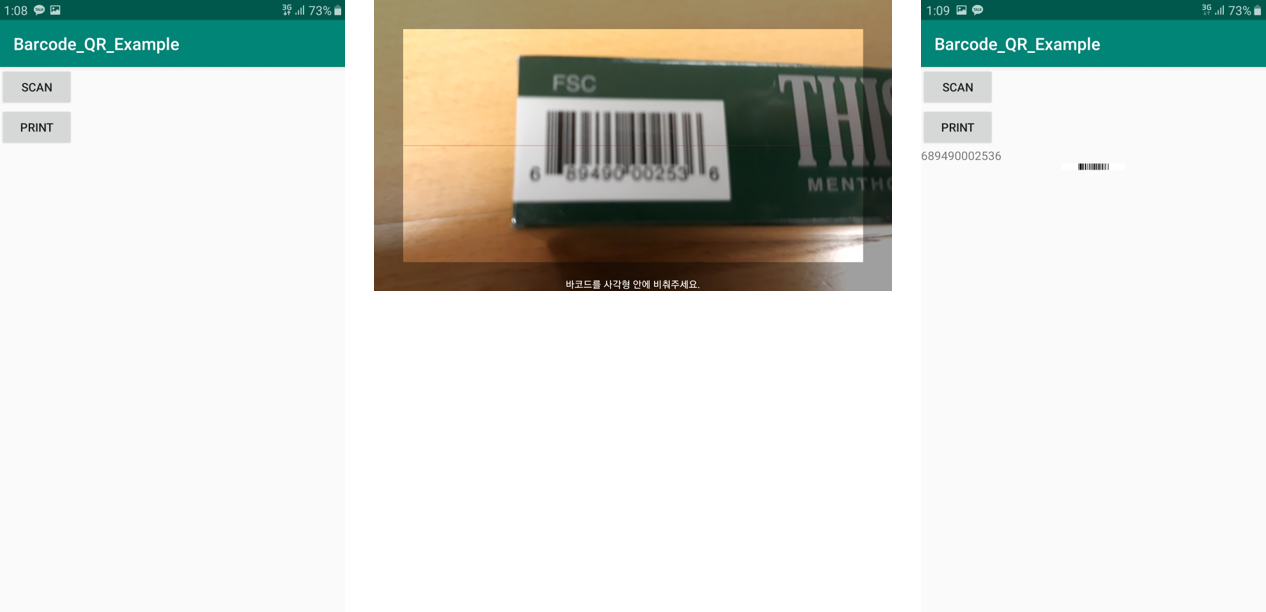
바코드 이미지의 사이즈는 ImageView의 크기 조절과 MainActivity의 주석 부분을 수정.
반응형
'IT Study > Android' 카테고리의 다른 글
| [Android] 안드로이드 타이틀 바 / 상태 바 제거하기 (0) | 2020.02.19 |
|---|---|
| [Android] SHA 키 값 구하기 ERROR:Invalid Key Hash - Facebook Login API (0) | 2020.02.13 |
| [Android] 구글 OAuth 2.0과 Facebook 로그인 API Log out/Sign out (0) | 2020.02.12 |
| [Android] Fragment에 TimeTask를 이용한 Auto Scroll View Pager 구현 (5) | 2019.12.05 |
| [Android] SharedPreferences를 이용한 데이터 저장 (0) | 2019.11.01 |

댓글